
How To Cull And Edit Quickly From Your iPad
If you dread culling as much as I do, then you’ve come to the right place!
I invested in an iPad Pro as a last-minute write-off for 2019 with the intentions of learning how to cull from it… fast forward 8 months later, I finally figured out how thanks to my photo bestie Whitney!
What’s The Difference Between the Two Lightrooms?
Most professional photographers use Lightroom Classic instead of Lightroom CC (Creative Cloud). It gives you a lot more editing freedom and controls over your personalization (custom brushes, radials filters, etc). If you subscribe to the Adobe Creative Cloud Suite you have access to a variety of photo editing programs (CC and Classic are both included).
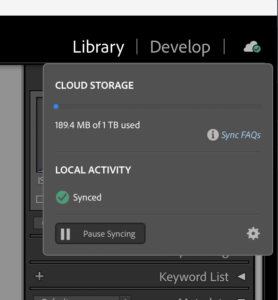
In the top right corner of Lightroom Classic, you’ll see a cloud icon that will give you a variety of sync options. Follow the prompts to set that up. You’ll have to have the Lightroom app download on your mobile device (can be phone or iPad) and just double check the sync is happening from there, too. Your iPad will have to be connected to the internet to actively sync to the cloud. If you’re on the go, you can use your phone as a hotspot!
I don’t sync more than 8 sessions at a time, so the standard/included 20gb of cloud storage is plenty! Don’t waste your money on the extra storage becasue the more sessions you have synced, the slower the program will run.
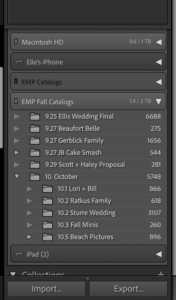
I used to create a new catalog each year, have a folder for each month, and a subfolder for each session organized by their date. Once I started to pick up speed though, I had to start making a new catalog each month. The more images that are stored in a catalog, the slower it becomes. I highly recommend creating new catalogs periodically to make sure everything stays fresh and fast.
Setting Up The Sync
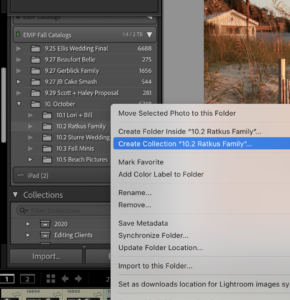
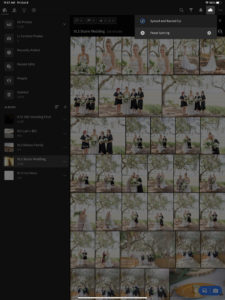
Back in your LR Classic catalog on your computer, right-click on the folder you want to sync with your mobile device and create a collection. When another window popups, confirm that you want to make it a collection. The collections are what actually sync in the cloud since they are only using smart previews (this is also why it’s quicker to cull on your iPad because it’s only a preview loading).
In the left menu area, scroll down to the bottom where it says collections and make sure you see that double-sided arrow next to the collection name. That means you’re syncing. If you see 3 dots under the double arrow, that means its in the process of syncing to the cloud.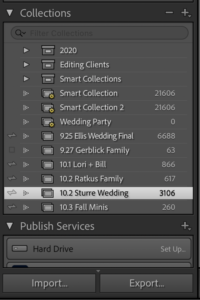
On your iPad, you can check the status of the sync by clicking the cloud in the top right corner. Since I use AfterShoot to cull my photos first, so they’re already rated for me. My AfterShoot culling is still pretty broad, I only have them get rid of duplicates and out of focus images.
Time To Cull
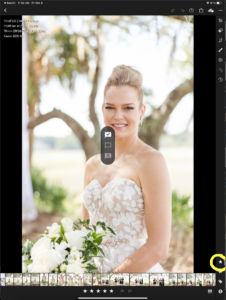
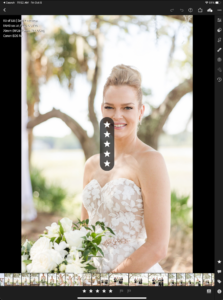
I filter the session to where I only see flagged & unflagged images that are rated 5 stars.
There are 2 gestures that will help you cull quickly. To access them, make sure you’re in the star menu (circled in yellow below) On the right side of the screen, swipe up with your finger to flag/pick, swipe down to reject. On the left side of the screen, your swipe up or down controls the star rating.
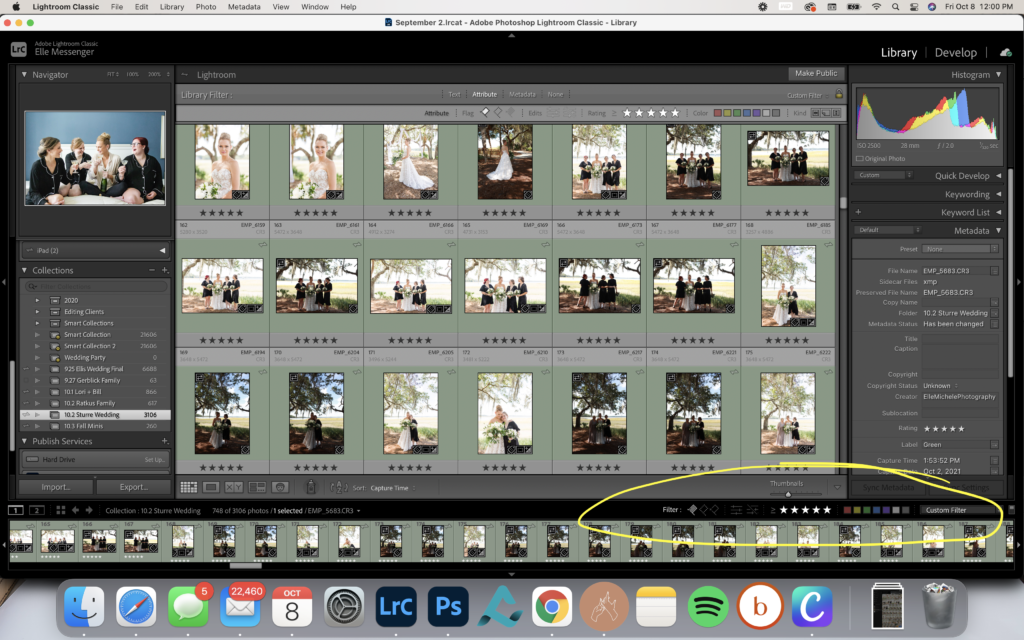
Back in your main catalog on your computer, you can filter the gallery to only show the images that are flagged and/or unflagged to show the ones that you’ve culled (circled in yellow – again, I do flagged & photos rated 5 stars).
Once the gallery has been culled, I import the session to ImagenAI so it can take care of the bulk of my editing.
After Imagen has done its thangggg I open LR back up on my computer and let the edits sync back to my iPad! From here, I finish tweaking the session from my iPad. I’ll adjust the horizon lines and crops of all the final images, and I remove a lot of distractions from photos as well.
I actually prefer the spot healing tool on my ipad than the one on my computer! Especially when paired with the Apple Pencil, I’m able to have a lot more control.
Does It Always Work?
There’s an occasional downfall to the iPad though because sometimes flags get stuck in the cloud and they don’t always show up on my computer. I just make sure that the final number of flagged images on my iPad matches the number on my computer and if any are missing I’ll run my edits on the computer so that it’s easier to see the ones that were missed on the iPad.
I know it sounds a little confusing and has a lot of back and forth, but once you get the hang of it you’ll realize how easy it is!
Wondering Which iPad and Accessories To Get?
I have two money mottos that I live by in my business – “buy it nice or buy it twice” and “go big or go home!” I’m a huge fan of just going all in and making the most of it! I went for the 12.9″ iPad Pro and these are the accessories I love for it:
Whenever you’re ordering accessories for your iPad, always always always double check the size you’re getting! I can’t tell you the number of times I’ve ordered the wrong size (and then forget about returning it)
If you want to find out how this girl that can’t save a dime can afford all this equipment, check out my secrets on this blog post!
If This Was Helpful…
Be sure to check out my LR Keyboard Shortcuts Freebie! Reduce the amount of time you’re going back and forth from your mouse to your keyboard and speed up your editing even MORE!
If you’re looking for more guidance on how to streamline your systems, check out my mentoring opportunities!